¿Prefieres hablar español?
pregunta por Ken

First thing we will need to do to setup a business card with proper separations in order to achieve Spot UV Gloss/Varnish (or Foil Stamping). Open your otherwise print-ready artwork in Adobe illustrator.
From our previous tutorial on setting up a basic print-ready business card, we have added crop marks indicating the trim line at 3.5" x 2"--you can add crop-marks by using the rectangle tool (M), create a rectangle precisely as 3.5" x 2", with this rectangle still selected; indicate no fill color, no stroke color--with this no-fill/no-stroke rectangle still selected, align to centre of artboard -- now under the top menu "Effect" > select "Crop-Marks". We have organized this crop-mark rectangle on a layer of its own, we named ours "Crop-marks".
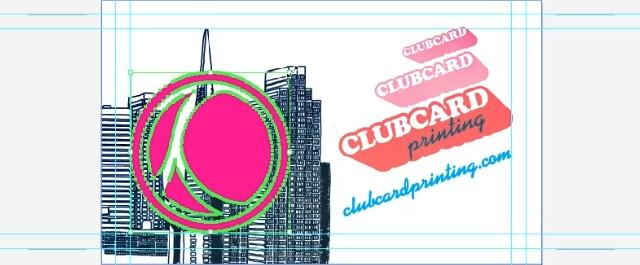
Otherwise, we find all of our CMYK artwork elements (from previous tutorial) on one layer, we will rename this layer "CMYK"--on this CMYK layer we have our outlined type (100% CYAN) "clubcardprinting.com", as well as the rasterized image (in CMYK color) which is embedded in the document.
Next step is to create a new layer, we will name this layer "SPOT UV" -- on this new SPOT UV layer we will paste the Clubcard symbol vector-element that we will use for the Spot UV gloss treatment. Place this pasted graphic in the location desired with respect to the elements beneath on CMYK printing layer. In the case when you have images and/or vector graphics in the original CMYK artwork which you would like to be printed as well as apply the SPOT UV gloss varnish effect on top of the printing; you will need to make a copy of those elements and paste/move them in-place into the SPOT UV layer. You will want to be sure to retain the exact position from CMYK layer to the SPOT UV layer above.
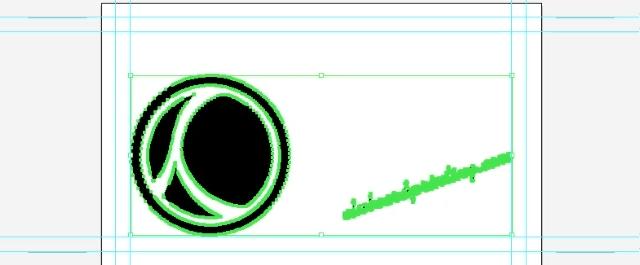
Now that we have all of the elements on our SPOT UV layer that we want to use for SPOT UV gloss treatment, we will now have to apply 100% Black ink only fill to these vector elements -- it is important that all graphic elements on this SPOT UV separation layer are prepared as 100% Black Ink only, (0, 0, 0, 100). If you are using raster-based elements to define the SPOT UV, these raster images should be built as GREYSCALE (black-ink only pixel information). From here, it is just a matter of saving the print-ready PDF documents--CMYK and SPOT UV layers in separate files. There are several different ways to achieve this, here we have described the easiest method based on our working file.
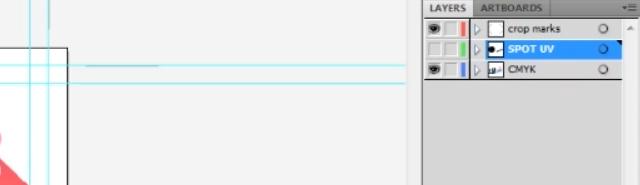
1. Turn the SPOT UV layer on and turn the CMYK layer off. Select File > Save As and append a logical extension of name for this SPOT UV separation file; for instance "bcard_SPOTUV". Under “Save as type” select “Adobe PDF (*.PDF).
It is important to make sure we have clearly indicated the position of our SPOT UV elements within the document, relative to the format edge (aka trim-line) using the crop-marks as reference. Because our crop-marks fall outside of the document bounds, inside the Save Adobe PDF setting we will need to extend the bleed area; under the “Marks and Bleed" tab, disable the “Use Document Bleed Setting”--we have added 0.375 inch (3/8”) per each side (which will suffice to include the crop-). Click save, and your PDF separation of the SPOT UV layer will be saved to the location indicated.
2. Back to the working Illustrator file still open—in the layer dialog turn the CYMK layer ON and turn the SPOT UV layer OFF. Again, Select File > Save As and save it with a logical name making your intentions for the file clear; such as “bcard_CMYK”. Under “Save as type” select “Adobe PDF (*.PDF)”.
Be sure that under “Compression” tab you are not unexpectedly down-sampling your raster-based images -- “Color Bitmap Images”, select “Do Not Down sample” and that the Compression is set to ZIP (a lossless compression).
Again, we need to extend the documents to include our crop marks which fall outside of the document bounds. Under “Mark and Bleeds” tab disable “Use Document Bleed Setting” and add a .375 inch (3/8”) bleed per each side (this will include enough of the crop-marks to give clear indication of trim-line). Click save, and your PDF of the CMYK ink separations layer will be saved to location indicated.
You can simply put these 2 PDF files into a .ZIP folder and supply with your order request—the clearly logical naming convention used; “bcard_SPOTUV.pdf” and “bcard_CMYK.pdf”, will eliminate any questions how each file is to be used.

Leave a comment